7-Segments LED display Arduino
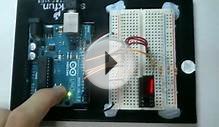
 within tutorial we show you tips connect a 7 portion display to an Arduino board. For a tutorial showing just how to drive 4 or 8 digit displays see (Arduino several digit, 7 portion show guide). Firstly, we ought to understand what style of display we as there's two feasible forms, common cathode and typical anode. If display is typical cathode, then your LOWER voltage side is typical, if display is typical anode, then HIGHER current part is typical. See Checking polarity of 7segment show if you are uncertain of both the polarity or pinout of display.
Things you'll need with this tutorial:
- A 7 portion screen
- 8 resistors that really work along with your show (range: 300R-2K2)
- An Arduino board with line and breads board
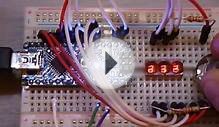
 Driving an individual 7 portion display
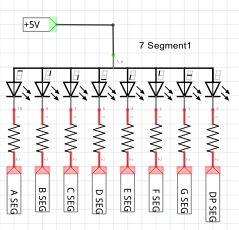
Far left: the circuit we are going to build shown as a schematic; in which A -G and DP connect to sequential production harbors on Arduino board. Each segment of show features a resistor in series to lower the present through the LED's. Note that although it might seem faster to get in touch one resistor to the typical pin, this will alter the brightness of this LED's depending what amount of segments had been turned on.
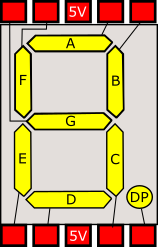
Kept: the visual view of a 7 segment display showing one typical arrangement for interior wiring and pin arrangement. This indicates a typical anode device and so the two center typical pins are connected to 5V. For typical cathode this would be GND.
 At this aspect, make a note of the starting production, because you will require it later on whenever publishing this system.
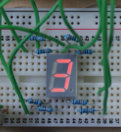
For this instance, the display ended up being typical anode, then COMMON is connected to +5V. More, we turn off the A-G pins to light a segment. In the event that screen had been typical cathode, we'd reverse this.
Counting in hex in one 7segment display
Here may be the rule for Arduino Studio, just paste this signal into an innovative new session and Upload once you have built the above circuit, you ought to get one show that matters up from 0 - F and resets.
In all 7-segment screen examples on this web site ledStart could be the first production slot you used (for segment an and all sorts of other sections must follow on sequentially). Typical must certanly be at either 5V or GND based polarity, variable commonHigh must certanly be set to real if common is attached to 5V or false if common is attached to GND.
// set this into the very first pin in which wiring begins. int ledStart = 30; // set to real if common pin is TALL, untrue otherwise boolean commonHigh = real; void setup { // Enable all A-G and DP and outputs, // set them to OFF (if common is high, then 1 is off). for(int i=0;i
RELATED VIDEO

Share this Post
Related posts
7 segment LED display PDF
Today I opened my brand-new Sparkfun 7-Segment show and tried my hand at using it as a broad purpose Arduino controller…
Read Morelatest posts
-
 LED Projector Lamp price January 16, 2024
 -
 LED light bulbs for sale cheap January 11, 2024
 -
 Light Bulb Shapes January 6, 2024
 -
 LED curing light for Gel nails January 1, 2024
 -
 LED Spot light bulbs December 27, 2023
 -
 Info on LED lights December 22, 2023
 -
 LED light Nail Dryer December 17, 2023
 -
 LED light for Gel polish December 12, 2023
 -
 LED Decorative Lamps December 7, 2023