
DIY LED Lamps
Create your own awesome brilliant Light-emitting Diode light bulb.
Step-by-step guidelines making your own personal LED light bulb for about $3.
To make a Light-emitting Diode lamp, you'll need a soldering metal and some solder, some LEDs and a pre-drilled circuit board. Additionally, you will need a classic, burnt-out incandescent bulb. To produce a LED bulb for around three bucks, go online for bulk LEDs. You'll find all of them from Asia now for approximately a buck with free shipping for 100 LEDs. The circuit board is available for approximately $2. They are pre-drilled with all the copper bands from the soldering side. Additionally need two items of scrap wire three inches very long.
White LEDs need about 3.2 to 3.4 volts each. Your RV or vehicle battery pack runs between 12 volts to 14 volts. Ordinarily it runs around 12.5 volts to 13 volts normally. To save cash, we shall not be utilizing a voltage regulator or current limiter the LED lamp. Rather, we shall make use of enough LEDs in series in order for them to restrict their current.
If you string 4 LEDs collectively, plus to minus and plus to minus, then you will have an overall total voltage of between 12.8 volts and 13.6 volts over the LEDs. By determining 3.2 volts x 4 LEDs, we get 12.8 volts total. Regarding large range, 3.4 volts x 4 LEDs gives us 13.6 volts total. Making use of these computations, the vehicle or RV average 12.5 volts to 13 volts is perfectly inside number of our LEDs, so no restricting resistor will likely be needed. Even when the battery does discuss 14 volts for a short time, it should maybe not harm the LEDs. They may get somewhat cozy, but must certanly be good.
 Assemble Your do-it-yourself LED lamp
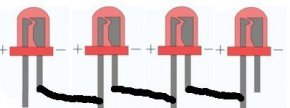
With the image below as a guide, start solding your LEDs together in rows of 4 you start with the Plus lead and linking to the next LEDs Minus lead, then Plus, Minus, Plus, Minus. The long leg of an LED may be the good lead.
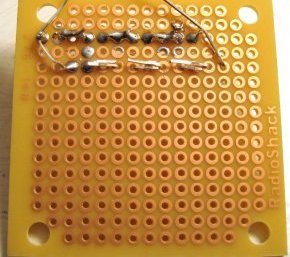
It is possible to hold your mouse over a picture below for a deeper view. In the 1st photo, you see one line of LEDs is soldered positioned. You will likely want to miss a hole among each LED in case they don't fit well.
Go through the second photo to see how to fold the Light-emitting Diode feet to speak to both. Slice the legs brief and fold one up to touch the one close to it. This can make sure an excellent electric contact. Into the 3rd image, you can view that a-row of holes ended up being missed among rows of LEDs. It's also possible to observe that the rows had been staggered slightly to permit room in between LEDs. This also develops the light pattern a bit whenever LED bulb is completed.
Your LEDs must certanly be added to the board as seen in the diagram below. Each line needs to have four LEDs linked collectively in series from + to - to + to - an such like.
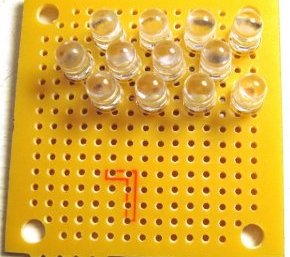
 Refer towards the photo below for the next action. While you reach the termination of each line, leave the outside Light-emitting Diode knee very long. Bend it up to attain across into the LED close to it. Zoom in on picture to observe how the LED feet externally rows tend to be soldered collectively along the sides. On left side would be the good lead. Regarding right side could be the negative lead.
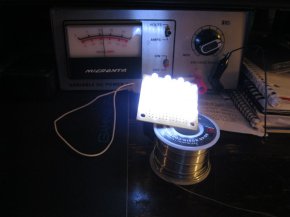
To prevent any dilemmas later on also to be sure that the do-it-yourself lamp is coming along really, connect the circuit board to a 12 volt power resource (or battery pack) sporadically to check the circuit. This may make certain that all of the prospects are soldered together well and there aren't any short pants or bad solder joints. In the event that you hold back until the whole lamp is finished to evaluate it, it should be harder to find the trouble spot.
In the image below, the voltage is just set-to 10 volts additionally the couple of LEDs in the board are generally placing completely a pleasant level of light. They're less expensive LEDs, so that the light output is a bit blue-tinted. But who cares, at that price.
Hold soldering and including rows to your LED lamp before the perfboard is complete. The only within instance has actually 8 rows of 4 LEDs for a total of 32 LEDs.
Test thoroughly your brand-new DIY LED light bulb again from the workbench to make sure all the solder connections are good. Into the picture, you can observe the Light-emitting Diode lamp is providing off enough energy to light perhaps the work surface below the LEDs. That is lots of light.
 BE CAUTIOUS when following next steps. Now you will recycle a vintage, burned out incandescent lamp to use its socket for the brand new Light-emitting Diode bulb. Wrap the old bulb in a rag, layers of paper or, even better, a vintage bubble wrap lined mailing envelope. Gently strike the cup with a tiny hammer to break the light bulb. Now, carefully knock out every one of the cup from inside the bulb. Wear heavy protective gloves when taking care of this step. You might want to pry out a few of the glass with a tiny screw driver. Gently contain the bulb socket in a couple of plyers in this step.
Now you need a thing that seems like the 2nd photo below. In the event that you broke the original wires, never be concerned. You'll solder in brand-new ones if required. Today connect an item of cable through the positive terminal of brand new Light-emitting Diode circuit board and run it toward center line associated with the lamp plug. The one that goes to the small lead end on the base of the lamp plug. Then link the unfavorable terminal of one's Light-emitting Diode bulb to the other wire of bulb plug, the one that links on not in the plug.
Your new Light-emitting Diode light bulb should look like the main one below.
Fill the socket with epoxy or hot glue to secure the cables and make certain they never ever break because vibration or stress. To install the brand new Light-emitting Diode bulb, merely push the light bulb to the light socket and perspective it while you would a normal incandescent light. After that secure the circuit board with a little bit of double sided tape to keep it positioned within lamp. Substitute the light address and revel in energy efficient light.
These LEDs are rated at 20, 000 MCD each. This gives united states a total of 640, 000 millicandela of light. This is equal to around 100 Lumens, which is the same in principle as the output of standard 15 Watt incandescent lamp within most autos, RVs and campers (first picture above). To transform Lumens to MCD and from MCD to Lumens, you can make use of our complimentary Lumens to MCD Calculator
The top distinction comes in the power cost savings. Your do-it-yourself LED light bulb only burns about 200 mA, which equals about 2.4 Watts. That's a sixth of energy use of your standard incandescent bulb. Along with your brand new LED bulb will outlast any incandescent light bulb by many years. After two years you will see a financial cost savings aswell.


RELATED VIDEO
Share this Post
Related posts

TCP LED Lamps
With more than 20 years of experience with energy conserving lighting effects, TCP knows how to provide you with technology…
Read More
Modern LED Lamps
Whilst casts ambient light downward from the uppermost point of an area, ceiling lighting effects is an essential component…
Read Morelatest posts
-
 LED Projector Lamp price January 16, 2024
 -
 LED light bulbs for sale cheap January 11, 2024
 -
 Light Bulb Shapes January 6, 2024
 -
 LED curing light for Gel nails January 1, 2024
 -
 LED Spot light bulbs December 27, 2023
 -
 Info on LED lights December 22, 2023
 -
 LED light Nail Dryer December 17, 2023
 -
 LED light for Gel polish December 12, 2023
 -
 LED Decorative Lamps December 7, 2023